This is a rewrite of a post I made in the Polycount forums from back when I didn't have a 1660ti. I felt that it was rambly and poorly written. Second time's a charm, right?
Substance Painter is the industry standard for texturing, it should be, it's good software, but boy is it unusable for people with low-end hardware. Of course I can't blame the devs, most people who can spend $20/month have decent rigs. But if you're not most people- like I wasn't, I never am ): - then you might find the next few paragraphs very interesting. By the end you'll still want to die, but at least you'll know that because your rig sucks, that doesn't mean your art has to suck too.
My Specs
Some things have changed since I originally wrote this, I now have a PNY 1660ti and 2x 16 gigs of 3200MHz ram
- CPU : AMD Ryzen 2400G 3.6 GHz 4C/8T
- GPU : AMD Vega 11 Graphics
- RAM : 2x Crucial 4GB 2400 Mhz DDR4
- Monitor Resolution : 1366 x 768
The Official Performance Guide
Getting the official advice out of the way...
- Only activate channels on fill layers that you actually use [source]
- Make sure the all the layers on top of the one you're modifying are hidden [source]
- If your PC is prone to crashing when exporting to 4k, Set the TDR Value to 1 [source]
- Setup your UV shells with the same materials to be close to each other [Source]
An Unconventional Solution...
While doing these things will definitely make things more bearable. It's still taking you like 2 minutes to add a single stroke in 2k hoping that the barely legible clouds you paint end up making sense once you export to 4k.
There's not much else you can do to make substance painter more bearable in 2k, so let's not bear with 2k, let's make it possible to do detailed work in 1k or 512? Sounds insane? Actually...
- You don't need a bigger map to have a better texel density, you just need bigger UV Shells
- Substance Painter can reproject strokes from one version of your mesh with different UVs or even geometry
- Even your shitty PC can probably run Substance painter decently at 512/1k
if you took one part of your lowpoly, scaled the UV to wombo, then scaled down all the other parts' UVs, you'd have the texel density of a 4k texture, with the performance of 1k. So you do your usual texture magic on that part, then use substance's reprojection tools to put all those details into the version with the final UVs
Even when rewritten, this looks bad, hopefully the next few paragraphs will fix that. And hopefully one day Adobe can come up with a way to just streamline all this, kind of like zbrush's "sculpt HD" feature.
( English actually is my first language, I have no excuses for this, I'm so sorry ): )
Before doing any of these, export your mesh with the final UVs(let's call it the Omega, because I am deep and 21). You're going to do a lot of things soon, you might forget to do this.
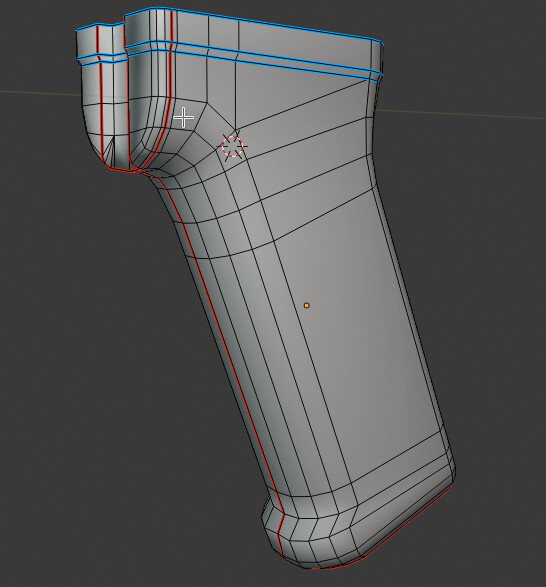
Let's say there's this one part of your asset that you can't afford to just cheese with slapping a smart material, like the receiver of an AR15 or an ACOG sight. In this case it's the ACOG, the ACOG is our focused object.
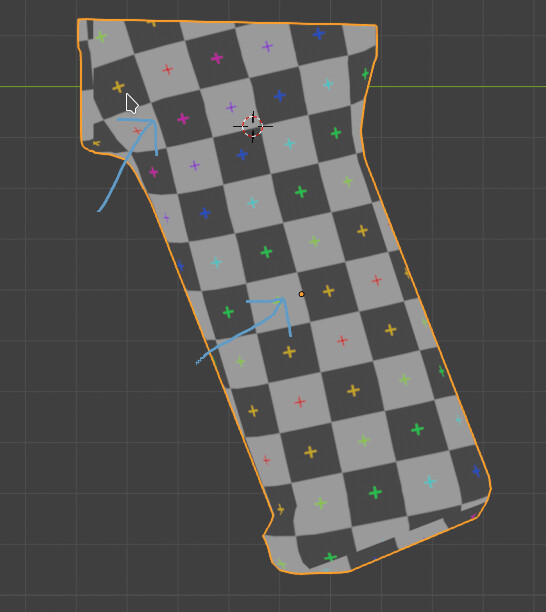
1. Isolate & pack: The focused object has already been separated, so I'll just pack it, as if no other object is there
2. Minify the rest: Resize the UVs of every other object. not delete, substance wont let you re-project to non-existent objects.
3. Pack them all together: You don't want them to overlap, do you?
4. Export: please name them.
I like to broadly texture the Omega to know what I'm working towards when I focus in and detail a single area. So I'll do that then go to "Edit > Project Configuration..."

Once it's done projecting, you'll want an exorcism, but good boys have faith in the substance reprojection algorithm and don't need to worry about your lost strokes or materials, because they know they aren't lost.

You'll also notice that your focused object is a bit off, that's because you'll need to rebake it. Unless you're stalling for time, I reccommend a simple 1k bake with 2x AA.

Now for the next few hours or minutes that you don't have a GPU from literally 2013. When you're done go to "Edit > Project Configuration..." menu just like before then load in your Omega mesh, making sure "Preserve strokes on mesh" is ticked

Do one more bake at max quality, make some finishing touches and you should be ready to export.
You know what to do, hit Ctrl + Shift + E then export in 4k. Get some tea or something and try not too think too much about the possibility of it crashing.
So this was at least "mildly inconvenient" maybe a bit "annoying", "soul crushing" even but it's really the only way to get the same quality of art as someone comfortably texturing on their nice GTX 1050 or something.
Things you'll never be able to do
- Use particle brushes
- Use that Photoshop live link
- Exporting in 8k
- Open the .spp files of the 3D bourgoise
- Use any of the more complicated materials